
DirectX11入门到实践-(1)窗口篇
这里以我做过的DirectX11游戏Demo为例,介绍DX11是如何实践的,GitHub地址
项目可能要设置一下环境,配置d3d11.lib等的linker
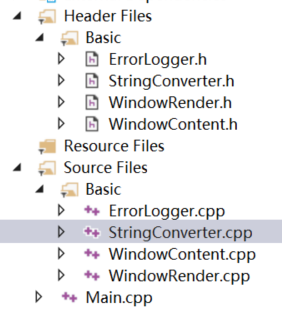
Basic最基础部分
另推荐,DirectX11 With Windows SDK 教程
一、设置Win32窗口
首先,开始DX11项目,我们要选择创建win32窗口程序,而非控制台程序
窗口Main函数
在Win32中,你需要定义wWinMain函数,作为程序的入口:
[Main.cpp]#include "Basic/Engine.h"int APIENTRY wWinMain(_In_ HINSTANCE hInstance, _In_opt_ HINSTANCE hPrevInstance, _In_ LPWSTR lpCmdLine, _In_ int nCmdShow){HRESULT hr = CoInitialize(NULL);if (FAILED(hr)){ErrorLogger::Log(hr, "Failed to call CoInitialize.");return -1;}// 运行程序窗口Engine engine;engine.Initialize(hInstance, "RacingGame", "RacWindowClass", 800, 600); // 建立窗口对象while (engine.ProcessMessages() == true) // 主循环部分,详见后文{engine.Update();engine.RenderFrame();}return 0;}
与Console的main()不同,WinMain由事件驱动,如用户单击鼠标,或按键或计时器达到零之类的事件。当发生任何这些事件时,Windows会在消息中记录发生的事件,并将消息放入消息所在的程序的消息队列中。而我们开发的DX程序就基于这个
这里Engine,其实是我们对Win窗口逻辑的封装,本质如下:
[Engine.h]#pragma once#include "WindowContent.h"#include "Timer.h"class Engine : public WindowContent{public:bool Initialize(HINSTANCE hInstance, std::string windowTitle, std::string windowClass, int width, int height);void Update();void RenderFrame();private:Timer timer;float cameraSpeed = 0.006f;float carSpeed = 0.003f;float carRotSpeed = 0.003f;};
可见主要是提供了一些生命周期接口,而WindowContent的成员有:
[WindowContent.h]#pragma once#include "ErrorLogger.h"#include "..\Input\Keyboard.h"#include "..\Input\Mouse.h"#include "..\Graphics\Graphics.h"class WindowContent{public:WindowContent();LRESULT WindowProc(HWND hwnd, UINT uMsg, WPARAM wParam, LPARAM lParam);bool ProcessMessages();HWND GetHWND() const;~WindowContent();protected:bool virtual Initialize(WindowContent* pWindowContainer, HINSTANCE hInstance, std::string windowTitle, std::string windowClass, int width, int height);Keyboard keyboard;Mouse mouse;Graphics graphics;private:void RegisterWindowClass(); // 注册窗口类HWND handle = NULL;HINSTANCE hInstance = NULL;std::string windowTitle = "";std::wstring windowTitleWide = L"";std::string windowClass = "";std::wstring windowClassWide = L"";int width = 0;int height = 0;};
首先,定义Engine engine,会触发构造函数
WindowContent::WindowContent(){// 设置原始输入static bool rawInputInitialized = false;if (rawInputInitialized == false){RAWINPUTDEVICE rid;rid.usUsagePage = 0x01; // Mouserid.usUsage = 0x02;rid.dwFlags = 0;rid.hwndTarget = NULL;if (RegisterRawInputDevices(&rid, 1, sizeof(rid)) == FALSE){ErrorLogger::Log(GetLastError(), "Failed to register raw input devices.");exit(-1);}rawInputInitialized = true;}}WindowContent::~WindowContent(){if (this->handle != NULL){UnregisterClass(this->windowClassWide.c_str(), this->hInstance);DestroyWindow(handle);}}
然后,就可以由Initialize进行win32窗口设置了
窗口初始化
注册窗口类
[WindowContent.cpp]void WindowContent::RegisterWindowClass(){WNDCLASSEX wc; // 定义窗口类,接下来我们修改其数据成员wc.style = CS_HREDRAW | CS_VREDRAW | CS_OWNDC;wc.lpfnWndProc = HandleMessageSetup; // 关键设置,让窗口消息转发到我们自定义函数中处理wc.cbClsExtra = 0;wc.cbWndExtra = 0;wc.hInstance = this->hInstance;wc.hIcon = NULL;wc.hIconSm = NULL;wc.hCursor = LoadCursor(NULL, IDC_ARROW);wc.hbrBackground = NULL;wc.lpszMenuName = NULL;wc.lpszClassName = this->windowClassWide.c_str();wc.cbSize = sizeof(WNDCLASSEX);RegisterClassEx(&wc); // 最终注册窗口类}
新建窗口对象并显示
bool WindowContent::Initialize(WindowContent * pWindowContainer, HINSTANCE hInstance, std::string windowTitle, std::string windowClass, int width, int height){this->hInstance = hInstance; // h表示handlethis->width = width;this->height = height;this->windowTitle = windowTitle;this->windowTitleWide = StringConverter::StringToWstring(this->windowTitle);this->windowClass = windowClass;this->windowClassWide = StringConverter::StringToWstring(this->windowClass);// 注册窗口类this->RegisterWindowClass();// 创建窗口(返回Windows将分配此新窗口的句柄)this->handle = CreateWindowEx(0, this->windowClassWide.c_str(), this->windowTitleWide.c_str(), WS_CAPTION | WS_MINIMIZEBOX | WS_SYSMENU, 0, 0, this->width, this->height, NULL, NULL, this->hInstance, pWindowContainer);if (this->handle == NULL){ErrorLogger::Log(GetLastError(), "CreateWindowEX Failed for window: " + this->windowTitle);return false;}// 将窗口显示在屏幕上,并将其设置为主焦点ShowWindow(this->handle, SW_SHOW);SetForegroundWindow(this->handle);SetFocus(this->handle);return true;}RECT rc = { 0, 0, 800, 600 };// 可以用AdjustWindowRect(&rc, WS_OVERLAPPEDWINDOW, FALSE)调整窗口大小
句柄是一个int32,用于标识该窗口是哪一个窗口(id, 指针变种)
检索和分发此窗口的消息
// Called Every Time the Application Receives a MessageLRESULT CALLBACK HandleMessageSetup(HWND hwnd, UINT uMsg, WPARAM wParam, LPARAM lParam){switch (uMsg){case WM_NCCREATE:{const CREATESTRUCTW* const pCreate = reinterpret_cast<CREATESTRUCTW*>(lParam);WindowContent* pWindow = reinterpret_cast<WindowContent*>(pCreate->lpCreateParams);if (pWindow == nullptr){ErrorLogger::Log("Critical Error: Pointer to window container is null during WM_NCCREATE.");exit(-1);}SetWindowLongPtr(hwnd, GWLP_USERDATA, reinterpret_cast<LONG_PTR>(pWindow));SetWindowLongPtr(hwnd, GWLP_WNDPROC, reinterpret_cast<LONG_PTR>(HandleMsgRedirect));return pWindow->WindowProc(hwnd, uMsg, wParam, lParam);}default:return DefWindowProc(hwnd, uMsg, wParam, lParam); // 交给Win窗口默认消息处理}}// 这里有将wnd的部分消息交给HandleMsgRedirect处理LRESULT CALLBACK HandleMsgRedirect(HWND hwnd, UINT uMsg, WPARAM wParam, LPARAM lParam){switch (uMsg){case WM_CLOSE:DestroyWindow(hwnd);return 0;default:{// 检索ptr到窗口类WindowContent* const pWindow = reinterpret_cast<WindowContent*>(GetWindowLongPtr(hwnd, GWLP_USERDATA));// 将消息转发到窗口类处理程序return pWindow->WindowProc(hwnd, uMsg, wParam, lParam);}}}而 WindowProc() switch处理 Keyboard 和 Mouse Messages,如:case WM_KEYDOWN:{unsigned char keycode = static_cast<unsigned char>(wParam);if (keyboard.IsKeysAutoRepeat())keyboard.OnKeyPressed(keycode);else{const bool wasPressed = lParam & 0x40000000;if (!wasPressed)keyboard.OnKeyPressed(keycode);}return 0;}case WM_MOUSEMOVE:{int x = LOWORD(lParam);int y = HIWORD(lParam);mouse.OnMouseMove(x, y);return 0;}
这些是设置每个Windows应用程序所需的窗口对象所需的最小步骤。编译并运行此代码,我们将看到一个空白背景的窗口。
主循环部分
bool WindowContent::ProcessMessages(){MSG msg; // Windows事件消息结构ZeroMemory(&msg, sizeof(MSG)); // 将整个内存块初始化为NULLif (PeekMessage(&msg, this->handle, 0, 0, PM_REMOVE)){TranslateMessage(&msg); // 将某些按键转换为正确格式的函数DispatchMessage(&msg); // 将消息发送到WindowProc函数}// 检查窗口是否关闭if (msg.message == WM_NULL) // 窗口关闭{if (!IsWindow(this->handle)){this->handle = NULL;UnregisterClass(this->windowClassWide.c_str(), this->hInstance); // 释放窗口return false;}}return true; // 返回成功我们就进行后续Tick逻辑}
这里不用GetMessage,而是用PeekMessage,因为后者只是查看消息队列,并检查是否有任何消息在等待。如果没有,程序将继续,而不需要像GetMessage一样等待
我们的事件消息处理过程如下图:
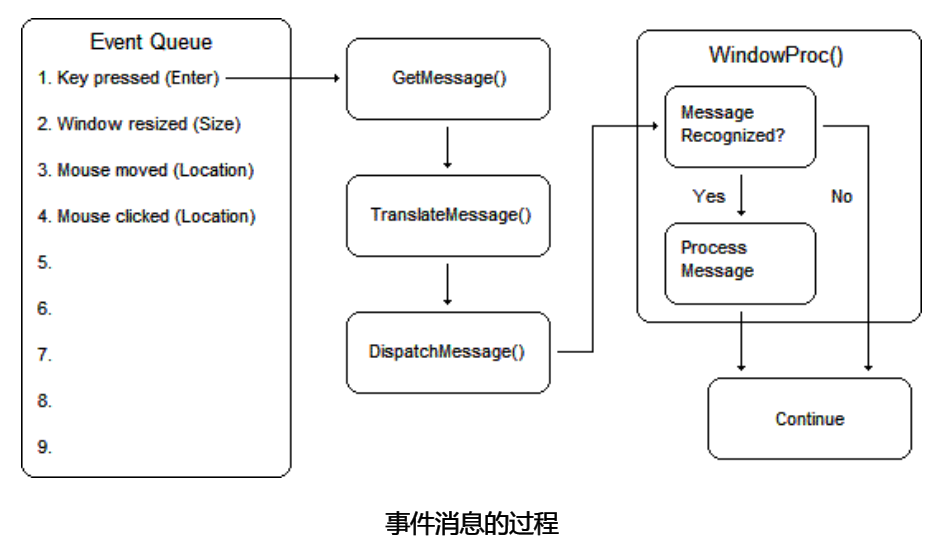
我们是通过事件来接受设备输入的,因此只要对事件做一个封装即可,当触发事件时,调用我们编写的keyboard类或Mouse类代码。
如触发WM_KEYDOWN事件,我们根据其参数wParam获得keycode,再调用keyboard.OnKeyPressed(keycode)进行按键后续处理。即可以用if (keyboard.KeyIsPressed('A'))判断是否按下A键,也可以通过事件绑定执行输入事件(通常情况下前者就足够了)。
附:消息框函数
MessageBox(NULL, L"Hello DirectX!", L"DxWindow32", MB_ICONEXCLAMATION | MB_OK);
二、设置设备、上下文和交换链等
如果我们要渲染任何3D场景,则必须进行设置。首先要做的是创建三个对象:设备,直接上下文和交换链
前面介绍了Engine,但其实我们的渲染部分,都是交给Graphics来做的,Init和RenderFrame最终都是调用Graphics的,其内容包括
[Graphics.h]class Graphics{public:bool Initialize(HWND hwnd, int width, int height);void RenderFrame();Camera camera;Light light;Model plane;Skybox skybox;Car car;private:bool InitializeDirectX(HWND hwnd);bool InitializeShaders();bool InitializeScene();// 设备,上下文,交换链,渲染目标视图,深度模板,光栅化,混合,采样器Microsoft::WRL::ComPtr<ID3D11Device> device;Microsoft::WRL::ComPtr<ID3D11DeviceContext> deviceContext;Microsoft::WRL::ComPtr<IDXGISwapChain> swapchain;Microsoft::WRL::ComPtr<ID3D11RenderTargetView> renderTargetView;Microsoft::WRL::ComPtr<ID3D11DepthStencilView> depthStencilView;Microsoft::WRL::ComPtr<ID3D11Texture2D> depthStencilBuffer;Microsoft::WRL::ComPtr<ID3D11DepthStencilState> depthStencilState;Microsoft::WRL::ComPtr<ID3D11RasterizerState> rasterizerState;Microsoft::WRL::ComPtr<ID3D11RasterizerState> rasterizerState_CullFront;Microsoft::WRL::ComPtr<ID3D11BlendState> blendState;Microsoft::WRL::ComPtr<ID3D11SamplerState> samplerState;VertexShader vertexshader;PixelShader pixelshader;ConstantBuffer<CB_VS_VertexShader> cb_vs_vertexshader;ConstantBuffer<CB_PS_PixelShader> cb_ps_pixelshader;std::unique_ptr<DirectX::SpriteBatch> spriteBatch;std::unique_ptr<DirectX::SpriteFont> spriteFont;Microsoft::WRL::ComPtr<ID3D11ShaderResourceView> planeTexture;int windowWidth = 0;int windowHeight = 0;Timer fpsTimer;};
首选科普一下-COM
COM代表组件对象模型。COM是一种创建非常高级对象的方法,实际上它们与积木很相似。实际上是C++类或类组,你可以从中调用函数并实现某些目标。
DirectX API基于组件对象模型COM。COM对象由一些暴露了方法的接口集组成,提供给开发者访问DirectX。
类似于C++对象,COM对象要求使用接口来访问内部实现的方法。相对于标准对象的一个实际的好处是在COM对象内部一个接口有不同版本的实现,从而允许向下兼容性。
Direct3D是一个COM对象,其中包含其他COM对象。如ID3D11Device、IDXGISwapChain这些以 I 开头的对象
ComPtr智能指针
本教程中大量使用了ComPtr智能指针,其可以帮助我们来管理这些COM组件实现的接口实例,而无需过多担心内存的泄漏。
该智能指针的大小和一般的指针大小是一致的,没有额外的内存空间占用。所以本教程可以不需要用到接口类ID3D11Debug来协助检查内存泄漏。
使用该智能指针需要包含头文件wrl/client.h,并且智能指针类模板ComPtr位于名称空间Microsoft::WRL内。

DirectX图形基础设施(DXGI)
DirectX的图形架构 是位于所有最新版本的Direct3D的基础组件。它的工作是处理基本任务,例如在屏幕上显示图像以及找出显示器和视频卡可以处理的分辨率。
DXGI实际上不是Direct3D的一部分。它是其他图形组件的基础,它充当Direct3D和硬件之间的接口。

用DXGI,来实现以下:
设备 ID3D11Device:包含了创建各种所需资源的方法,最常用的有:资源类(ID3D11Resource, 包含纹理和缓冲区),视图类以及着色器(可以理解设备为GPU)。
上下文 ID3D11DeviceContext:可以看做是一个渲染管线,D3D使用它来执行渲染到缓冲区。它需要绑定来自D3D设备创建的各种资源、视图和着色器才能正常运转(如深度模板、输入布局、图元类型、光栅化、混合、纹理等)。
交换链:什么是交换链?
为了避免屏幕撕裂(GPU比显示器快),DXGI实现了一个名为交换的功能。
交换链负责获取设备呈现的缓冲区,并在实际监视器屏幕上显示内容。交换链包含两个或多个缓冲区,主要是前端和后端。这些是设备呈现的纹理,以便在监视器上显示。
- 前缓冲区是当前向用户呈现的内容。此缓冲区是只读的,无法修改。
- 后台缓冲区是设备将绘制的渲染目标。一旦完成绘图操作,交换链将通过交换两个缓冲区来显示后备缓冲区(指针切换)。后缓冲区成为前缓冲区,反之亦然。
通过添加额外的后台缓冲区,我们可以让我们的游戏有更好的性能
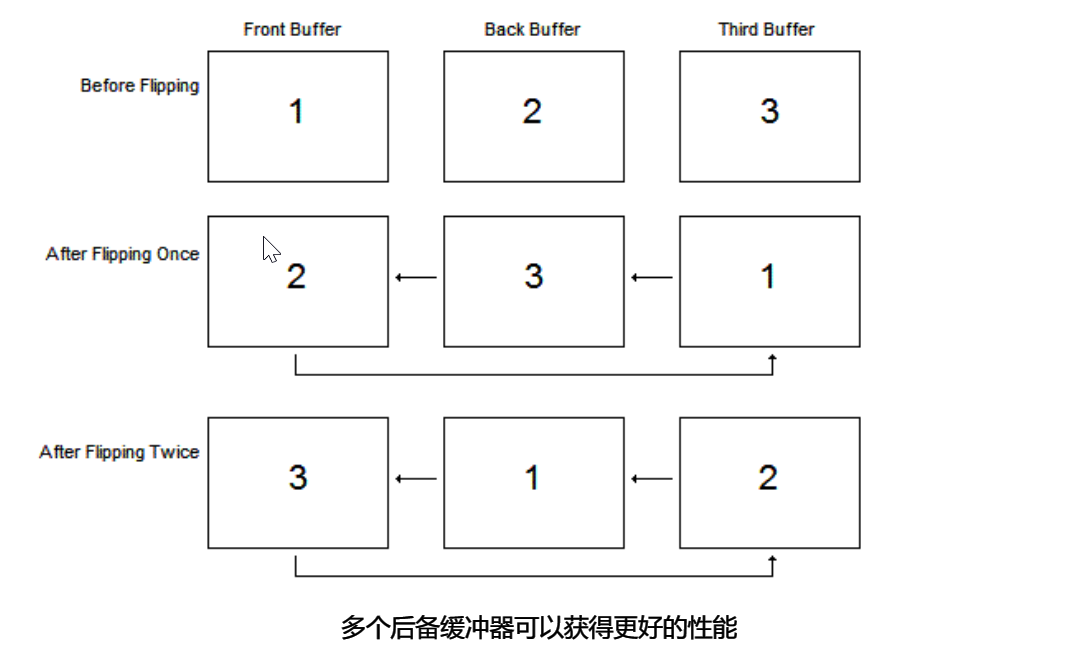
此设置称为交换链,因为它是一个缓冲区链,每次渲染新帧时交换位置(IDXGISwapChain)。
一般用D3D11CreateDevice函数创建D3D设备与D3D设备上下文,但D3D11CreateDeviceAndSwapChain
还能同时创建交换链:
bool Graphics::InitializeDirectX(HWND hwnd){try{std::vector<AdapterData> adapters = AdapterReader::GetAdapters();if (adapters.size() < 1){ErrorLogger::Log("No IDXGI Adapters found.");return false;}// 交换链描述DXGI_SWAP_CHAIN_DESC scd = { 0 };scd.BufferDesc.Width = this->windowWidth; // 设置窗口大小scd.BufferDesc.Height = this->windowHeight;scd.BufferDesc.RefreshRate.Numerator = 60;scd.BufferDesc.RefreshRate.Denominator = 1;scd.BufferDesc.Format = DXGI_FORMAT_R8G8B8A8_UNORM;scd.BufferDesc.ScanlineOrdering = DXGI_MODE_SCANLINE_ORDER_UNSPECIFIED;scd.BufferDesc.Scaling = DXGI_MODE_SCALING_UNSPECIFIED;scd.SampleDesc.Count = 1; // 采样一次scd.SampleDesc.Quality = 0; // 不启用多次采样scd.BufferUsage = DXGI_USAGE_RENDER_TARGET_OUTPUT; // 告知我们想渲染到该缓冲区scd.BufferCount = 1;scd.OutputWindow = hwnd; // 表示在该窗口屏幕上显示scd.Windowed = TRUE;scd.SwapEffect = DXGI_SWAP_EFFECT_DISCARD;scd.Flags = DXGI_SWAP_CHAIN_FLAG_ALLOW_MODE_SWITCH; // 允许窗口/全屏切换HRESULT hr;hr = D3D11CreateDeviceAndSwapChain(adapters[0].pAdapter, D3D_DRIVER_TYPE_UNKNOWN, NULL, NULL, NULL, 0, D3D11_SDK_VERSION, &scd, this->swapchain.GetAddressOf(), this->device.GetAddressOf(), NULL, this->deviceContext.GetAddressOf());COM_ERROR_IF_FAILED(hr, "Failed to create device and swapchain.");...
这里支持了用Alt-Enter进行窗口/全屏切换,也可以调用 swapchain-> SetFullscreenState(FALSE,NULL) 用代码强制切换到窗口模式
解释一下这里出现的适配器Adapter
为显卡、API适配而提供,通过DXGIFactory对每一个adapter进行包装(成AdapterData),后续再取用
[Adapter.hpp]#include <d3d11.h>#include <wrl/client.h>#include <vector>class AdapterData{public:AdapterData(IDXGIAdapter* pAdapter){this->pAdapter = pAdapter;HRESULT hr = pAdapter->GetDesc(&this->description);if (FAILED(hr)){ErrorLogger::Log(hr, "Failed to Get Description for IDXGIAdapter.");}}IDXGIAdapter* pAdapter = nullptr;DXGI_ADAPTER_DESC description;};class AdapterReader{private:static std::vector<AdapterData> adapters;public:static std::vector<AdapterData> GetAdapters(){// If already initializedif (adapters.size() > 0)return adapters;Microsoft::WRL::ComPtr<IDXGIFactory> pFactory;// Create a DXGIFactory object.HRESULT hr = CreateDXGIFactory(__uuidof(IDXGIFactory), reinterpret_cast<void**>(pFactory.GetAddressOf()));if (FAILED(hr)){ErrorLogger::Log(hr, "Failed to create DXGIFactory for enumerating adapters.");exit(-1);}IDXGIAdapter* pAdapter;UINT index = 0;while (SUCCEEDED(pFactory->EnumAdapters(index, &pAdapter))){adapters.push_back(AdapterData(pAdapter));index += 1;}return adapters;}};
Logger 日志类
一般用宏来判定HRESULT的结果,以得知是否成功执行代码,所以可以封装为一个Log类
[ErrorLogger.hpp]#define NOMINMAX#include "COMException.h"#include <Windows.h>class ErrorLogger{public:static void Log(std::string message){std::string error_message = "Error: " + message;MessageBoxA(NULL, error_message.c_str(), "Error", MB_ICONERROR);}static void Log(HRESULT hr, std::string message){_com_error error(hr);std::wstring error_message = L"Error: " + StringConverter::StringToWstring(message) + L"\n" + error.ErrorMessage();MessageBoxW(NULL, error_message.c_str(), L"Error", MB_ICONERROR);}static void Log(HRESULT hr, std::wstring message) {...略}static void Log(COMException & exception){std::wstring error_message = exception.what();MessageBoxW(NULL, error_message.c_str(), L"Error", MB_ICONERROR);}};
好了,终于可以回到正文,为了渲染出对象我们还要做很多工作...
渲染目标视图
渲染目标视图是D3D11中的一种资源视图,类似于原始内存块。资源视图允许资源在特定阶段绑定到图形管道,将交换链的后缓冲区绑定为渲染目标,这使D3D11能够渲染到它上面:
// 接上个函数Microsoft::WRL::ComPtr<ID3D11Texture2D> backBuffer; // 2DTexture类型hr = this->swapchain->GetBuffer(0, __uuidof(ID3D11Texture2D), reinterpret_cast<void**>(backBuffer.GetAddressOf())); // 在交换链上找到后台缓冲区并使用它来创建backBuffer纹理对象COM_ERROR_IF_FAILED(hr, "GetBuffer Failed.");// 创建 渲染目标视图hr = this->device->CreateRenderTargetView(backBuffer.Get(), NULL, this->renderTargetView.GetAddressOf());COM_ERROR_IF_FAILED(hr, "Failed to create render target view.");...
深度模板
创建深度/模板缓冲区用于深度测试
// Depth/Stencil BufferCD3D11_TEXTURE2D_DESC depthStencilTextureDesc(DXGI_FORMAT_D24_UNORM_S8_UINT, this->windowWidth, this->windowHeight); // 描述方式depthStencilTextureDesc.MipLevels = 1;depthStencilTextureDesc.BindFlags = D3D11_BIND_DEPTH_STENCIL;hr = this->device->CreateTexture2D(&depthStencilTextureDesc, NULL, this->depthStencilBuffer.GetAddressOf());COM_ERROR_IF_FAILED(hr, "Failed to create depth stencil buffer.");hr = this->device->CreateDepthStencilView(this->depthStencilBuffer.Get(), NULL, this->depthStencilView.GetAddressOf()); // 将创建好的2D纹理绑定到新建的深度/模板视图COM_ERROR_IF_FAILED(hr, "Failed to create depth stencil view.");this->deviceContext->OMSetRenderTargets(1, this->renderTargetView.GetAddressOf(), this->depthStencilView.Get()); // 输出合并阶段 绑定渲染目标视图和深度/模板视图// Create depth stencil stateCD3D11_DEPTH_STENCIL_DESC depthstencildesc(D3D11_DEFAULT);depthstencildesc.DepthEnable = true;depthstencildesc.DepthWriteMask = D3D11_DEPTH_WRITE_MASK_ALL;depthstencildesc.DepthFunc = D3D11_COMPARISON_FUNC::D3D11_COMPARISON_LESS_EQUAL;hr = this->device->CreateDepthStencilState(&depthstencildesc, this->depthStencilState.GetAddressOf());COM_ERROR_IF_FAILED(hr, "Failed to create depth stencil state.");
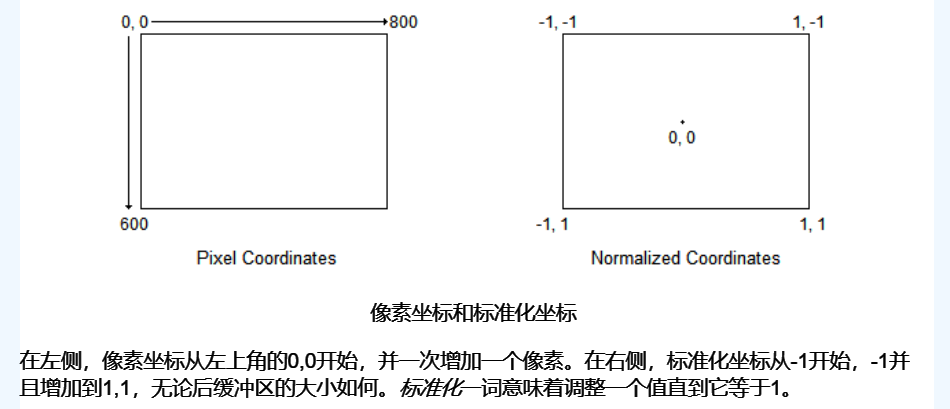
视口
最终我们还需要决定将整个视图输出到窗口特定的范围。因此我们需要使用D3D11_VIEWPORT来设置视口:
// Create & set the ViewportCD3D11_VIEWPORT viewport(0.0f, 0.0f, static_cast<float>(this->windowWidth), static_cast<float>(this->windowHeight)); // 设置初始参数this->deviceContext->RSSetViewports(1, &viewport);
光栅化
我们设置了只渲染正面
// Create Rasterizer StateCD3D11_RASTERIZER_DESC rasterizerDesc(D3D11_DEFAULT);hr = this->device->CreateRasterizerState(&rasterizerDesc, this->rasterizerState.GetAddressOf());COM_ERROR_IF_FAILED(hr, "Failed to create rasterizer state.");// Create Rasterizer State for culling frontCD3D11_RASTERIZER_DESC rasterizerDesc_CullFront(D3D11_DEFAULT);rasterizerDesc_CullFront.CullMode = D3D11_CULL_MODE::D3D11_CULL_FRONT;hr = this->device->CreateRasterizerState(&rasterizerDesc_CullFront, this->rasterizerState_CullFront.GetAddressOf());COM_ERROR_IF_FAILED(hr, "Failed to create rasterizer state.");
混合
混合半透设置
// Create Blend StateD3D11_RENDER_TARGET_BLEND_DESC rtbd = { 0 };rtbd.BlendEnable = true;rtbd.SrcBlend = D3D11_BLEND::D3D11_BLEND_SRC_ALPHA;rtbd.DestBlend = D3D11_BLEND::D3D11_BLEND_INV_SRC_ALPHA;rtbd.BlendOp = D3D11_BLEND_OP::D3D11_BLEND_OP_ADD;rtbd.SrcBlendAlpha = D3D11_BLEND::D3D11_BLEND_ONE;rtbd.DestBlendAlpha = D3D11_BLEND::D3D11_BLEND_ZERO;rtbd.BlendOpAlpha = D3D11_BLEND_OP::D3D11_BLEND_OP_ADD;rtbd.RenderTargetWriteMask = D3D11_COLOR_WRITE_ENABLE::D3D11_COLOR_WRITE_ENABLE_ALL;D3D11_BLEND_DESC blendDesc = { 0 };blendDesc.RenderTarget[0] = rtbd;hr = this->device->CreateBlendState(&blendDesc, this->blendState.GetAddressOf());COM_ERROR_IF_FAILED(hr, "Failed to create blend state.");
最后,(贴图)采样器
spriteBatch = std::make_unique<DirectX::SpriteBatch>(this->deviceContext.Get());spriteFont = std::make_unique<DirectX::SpriteFont>(this->device.Get(), L"Data\\Fonts\\comic_sans_ms_16.spritefont");// Create sampler description for sampler stateCD3D11_SAMPLER_DESC sampDesc(D3D11_DEFAULT);sampDesc.AddressU = D3D11_TEXTURE_ADDRESS_WRAP;sampDesc.AddressV = D3D11_TEXTURE_ADDRESS_WRAP;sampDesc.AddressW = D3D11_TEXTURE_ADDRESS_WRAP;hr = this->device->CreateSamplerState(&sampDesc, this->samplerState.GetAddressOf());COM_ERROR_IF_FAILED(hr, "Failed to create sampler state.");}catch (COMException & exception) // 异常处理{ErrorLogger::Log(exception);return false;}return true;}
终于,可以渲染帧
void Render(){// Just clear the backbufferg_pImmediateContext->ClearRenderTargetView( g_pRenderTargetView, Colors::MidnightBlue ); // 将后台缓冲区清除为蓝色g_pSwapChain->Present( 0, 0 ); // 切换后台缓冲区和前台缓冲区}
这时运行我们就能看到一个被渲染成蓝色的窗口了
其他(知识补充)
基元
基元是3D环境中的单个元素,可以是三角形,直线,点等等。以下是可以组合基元以创建3D对象的方法列表。
- 点列表
- 线列表
- 线条
- 三角形列表
- 三角形条带
鼠标和键盘输入
一次输入封装成一个Event
再由Mgr记录和控制多次输入的Event
[MouseEvent.h]struct MousePoint{int x;int y;};[KeyboardEvent.h]class KeyboardEvent{public:enum EventType{Press,Release,Invalid};KeyboardEvent();KeyboardEvent(const EventType type, const unsigned char key);bool IsPress() const;bool IsRelease() const;bool IsValid() const;unsigned char GetKeycode() const;private:EventType type;unsigned char key;};[Keyboard.h]#include <queue>class Keyboard{public:Keyboard();bool KeyIsPressed(const unsigned char keycode);bool KeyBufferIsEmpty();bool CharBufferIsEmpty();KeyboardEvent ReadKey();unsigned char ReadChar();void OnKeyPressed(const unsigned char key){this->keyStates[key] = true;this->keyBuffer.push(KeyboardEvent(KeyboardEvent::EventType::Press, key));}void OnKeyReleased(const unsigned char key);void OnChar(const unsigned char key);void EnableAutoRepeatKeys();void DisableAutoRepeatKeys();void EnableAutoRepeatChars();void DisableAutoRepeatChars();bool IsKeysAutoRepeat();bool IsCharsAutoRepeat();private:bool autoRepeatKeys = false;bool autoRepeatChars = false;bool keyStates[256];std::queue<KeyboardEvent> keyBuffer;std::queue<unsigned char> charBuffer;};
这些类实例放到Engine中进行处理,发挥作用
Timer计时器
基于chrono的now、duration等接口实现
#include <chrono>class Timer{public:Timer();double GetElapsedTime();void Restart();bool Stop();bool Start();private:bool isRunning = false;#ifdef _WIN32std::chrono::time_point<std::chrono::steady_clock> start;std::chrono::time_point<std::chrono::steady_clock> stop;#elsestd::chrono::time_point<std::chrono::system_clock> start;std::chrono::time_point<std::chrono::system_clock> stop;#endif};
COMException
是我们封装的一个异常处理模块
#define COM_ERROR_IF_FAILED( hr, msg ) if( FAILED( hr ) ) throw COMException( hr, msg, __FILE__, __FUNCTION__, __LINE__ )class COMException{public:COMException(HRESULT hr, const std::string& msg, const std::string& file, const std::string& function, int line){_com_error error(hr);whatmsg = L"Msg: " + StringConverter::StringToWstring(std::string(msg)) + L"\n";whatmsg += error.ErrorMessage();whatmsg += L"\nFile: " + StringConverter::StringToWstring(file);whatmsg += L"\nFunction: " + StringConverter::StringToWstring(function);whatmsg += L"\nLine: " + StringConverter::StringToWstring(std::to_string(line));}const wchar_t * what() const{return whatmsg.c_str();}private:std::wstring whatmsg;};